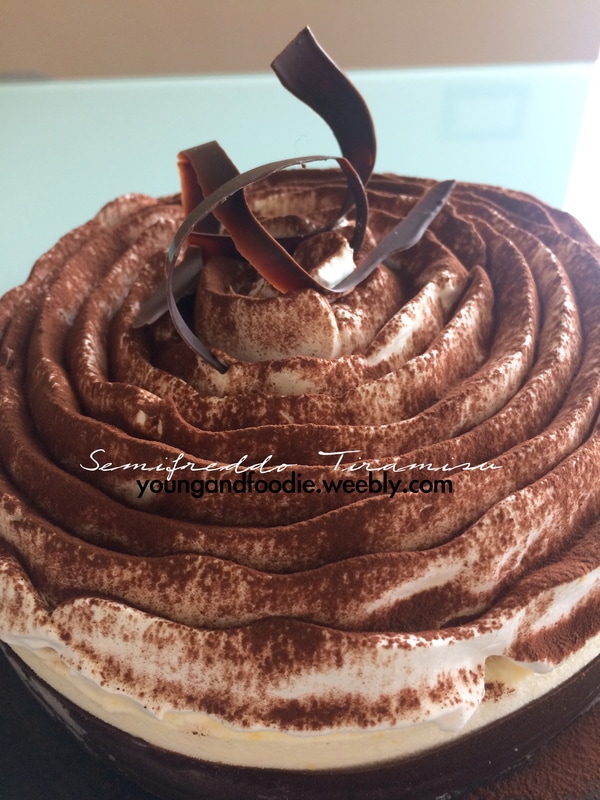
 Where do I even start? It’s been so long that this blog is getting dusty :( I’m so bad at uploading new recipes and I’m sorry for that. These past few months I’ve been busy working in a wonderful Chocolate Lab (Yes! How cool is that?!) and studying hard for my college exams and I have to admit it is pretty hard to combine those works! Meanwhile, between a chocolate praline and a engineering exam, something (else) AMAZING happened! I had the chance to go to the very first concert of the Divide Tour (in Turin) by Ed Sheeran! How amazing is that?! It was absolutely perfect! Plus, it was my birthday gift so it was even better to me. That guy is such a great performer and what a guitar man he is!!! Since I was out of town for my birthday, I didn’t bake a birthday cake that day but as soon as I got some free time back home, I baked something special. I mean, it was my 28th birthday after all! *insert old lady here*. So, I think you guys would like this one and so I’d like to share it with you. It does requires a lot of steps but trust me… It’s worths! So let’s start! Savoiardi: 3 eggs 90 gr granulated sugar 70 gr flour 20 gr potato flour Ingredients for the base: 88 gr egg yolks 170 gr granulated sugar 100 gr water Ingredients for the Italian Meringue: 110 gr egg whites 210 gr granulated sugar 50 gr water Ingredients for the Mascarpone cheese semifreddo: 50 gr base 30 gr Italian Meringue 85 gr Mascarpone cheese 85 gr Heavy whipped cream Ingredients for the Coffee semifreddo: 38 gr base 25 gr strong coffee 45 gr Italian Meringue 125 gr Heavy whipped cream Ingredients for the Coffee jelatin: 100 gr strong coffee 23 gr granulated sugar 3 gr leaf gelatin Directions: Let’s start by making the Savoiardi biscuits. Preheat the oven at 200°C. Separate the egg whites from the yolks. Take the first ones and put them with 60 gr of sugar and bring them to 40°C. At this point, you can start whisking them until they get soft and firm. Take the egg yolks and and the other 30 gr of sugar and whisk them for a couple of minutes. Put them with the meringue you previously made and blend it gently with a spoon. Now put the flour into the cream you’ve just made and keep blending. With a pastry bag, create a 16 cm diameter circle. You’re going to have some more batch. Don’t worry about that. Pipe some other biscuits. You’ll love them! Now, before baking them, put some powdered sugar on top of them and then you’re ready to put them in the oven. Bake for about 10 minutes and then let them cool. Now, we start by making the base and the Italian meringue. For the base, we need to bring the water and the sugar to 121°C. Then we have to pour the syrup on the egg yolks. Whisk them until they get cool. Now, let’s make the Italian meringue: bring 185 gr of water and the sugar to 121°C. Then we have to pour the syrup on the egg whites and the remaining 35 gr of sugar and whisk until it’s soft but firm (tip: put the bowl upside down and if nothing falls down, then you’re done). For the Mascarpone cheese layer you just have to take some of the base and mix it gently with the cheese, then add the meringue and the heavy cream. You should get a very soft cream. The Coffee semifreddo is the next layer. You have to pour the warm/cold coffee onto the base (it is VERY important to use Italian coffee otherwise this dessert won’t get any closer to the flavor it is supposed to have. And trust me, you DO WANT to taste that flavor!). Now add the meringue and the whipped cream, always mixing gently. The coffee gelatin is very quick to make. Put the gelatin leaf in some cold water for about 10 minutes, then add it to the bowl where you previously put the coffee and the sugar. Stir it for a minute and then you’re ready to put it in the freezer to harden. Assembly: I made this a 3 layers dessert. So I put the Savoiardo on the bottom, then the Mascarpone cheese layer, then the coffee gelatin and then the coffee layer. Put it in the freezer for at least 30 minutes and then you’re ready to go with some decorations! I used heavy whipped cream and made some twirly decorations with some cocoa powder on top. You could use some Mascarpone/coffee semifreddo leftovers as well! I also made a chocolate decorations for the perimeter of the cake and some others chocolate decorations to put on top of the cake. Hope you liked it! Leave me some nice comments :) 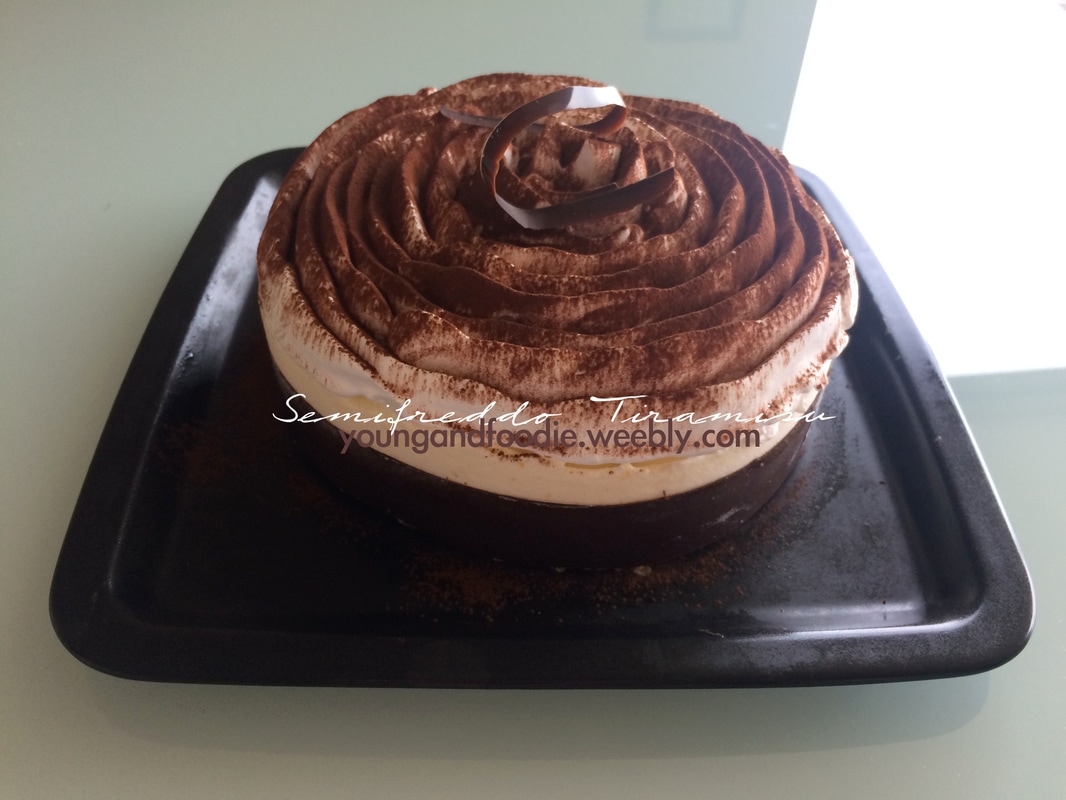 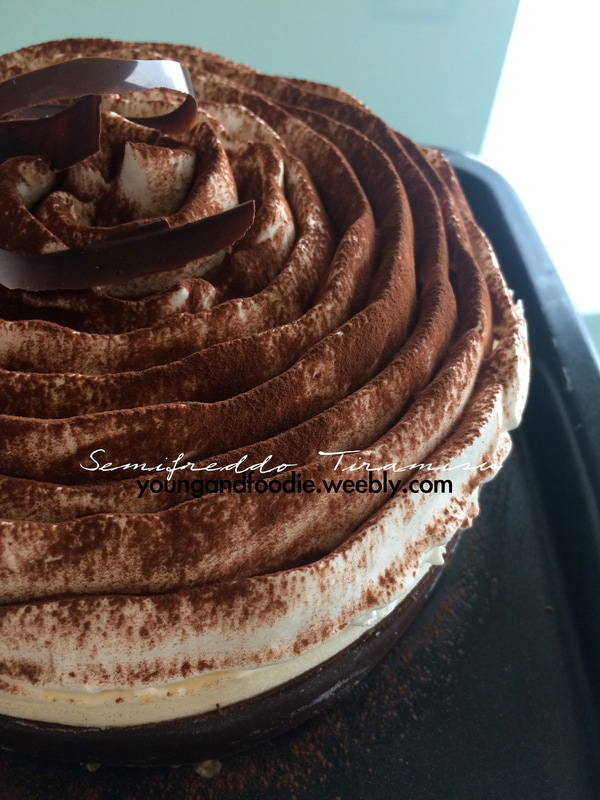 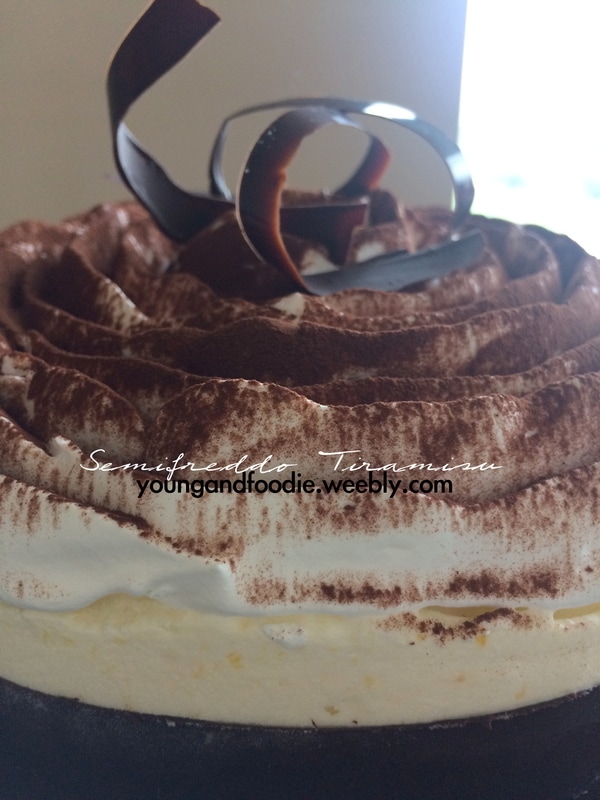 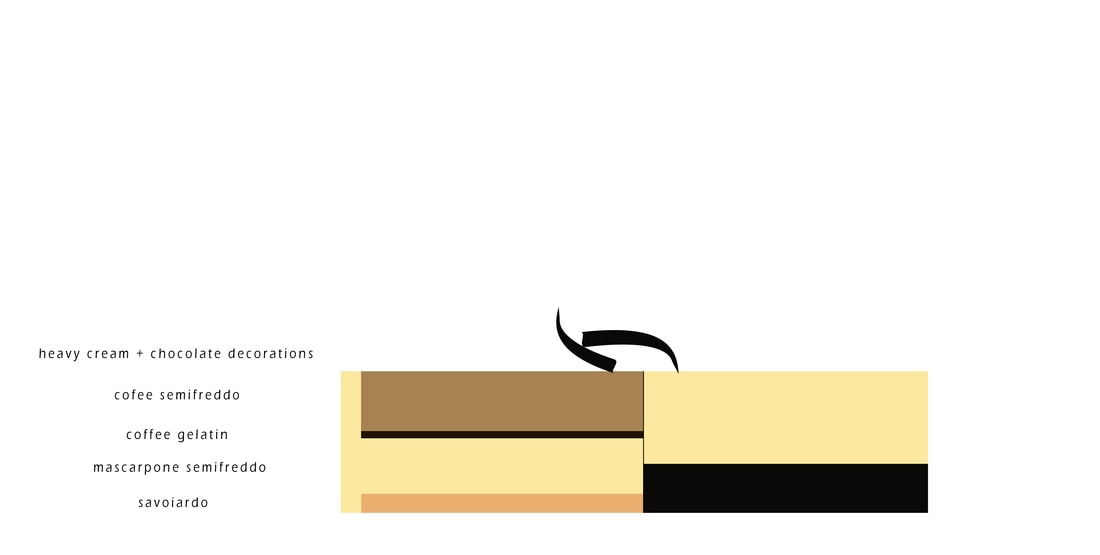
9 Comments
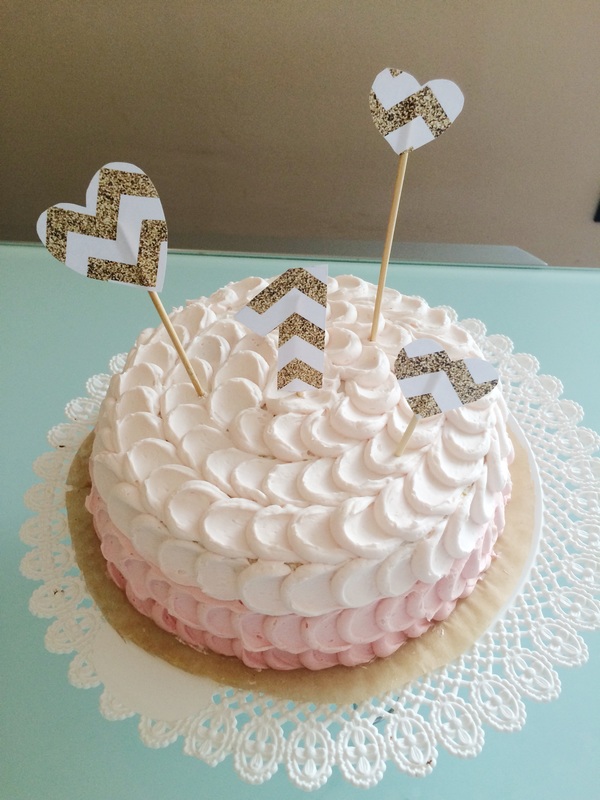 Just an update with my latest creation: a cake for my niece's 1st birthday! I wanted to create something special for her and I came up with this pink ombre cake. For the toppers, I used some gold/white pattern I found on the Internet and made some hearts out of it. What I love about baking is the joy and happyness you can donate. It's something that I'll be forever grateful for: being able to be a part of people's happy moments. Hope you like it as much as my family loved it :) Here's my IG profile where you can also see my pics (not always cake related lol) 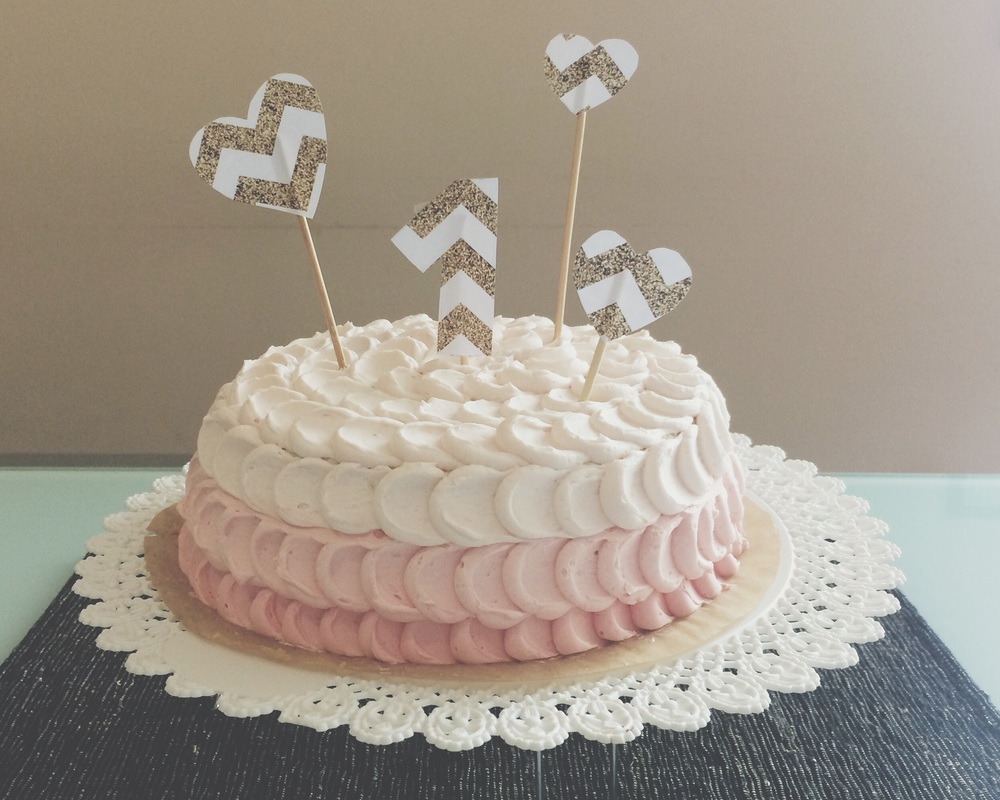 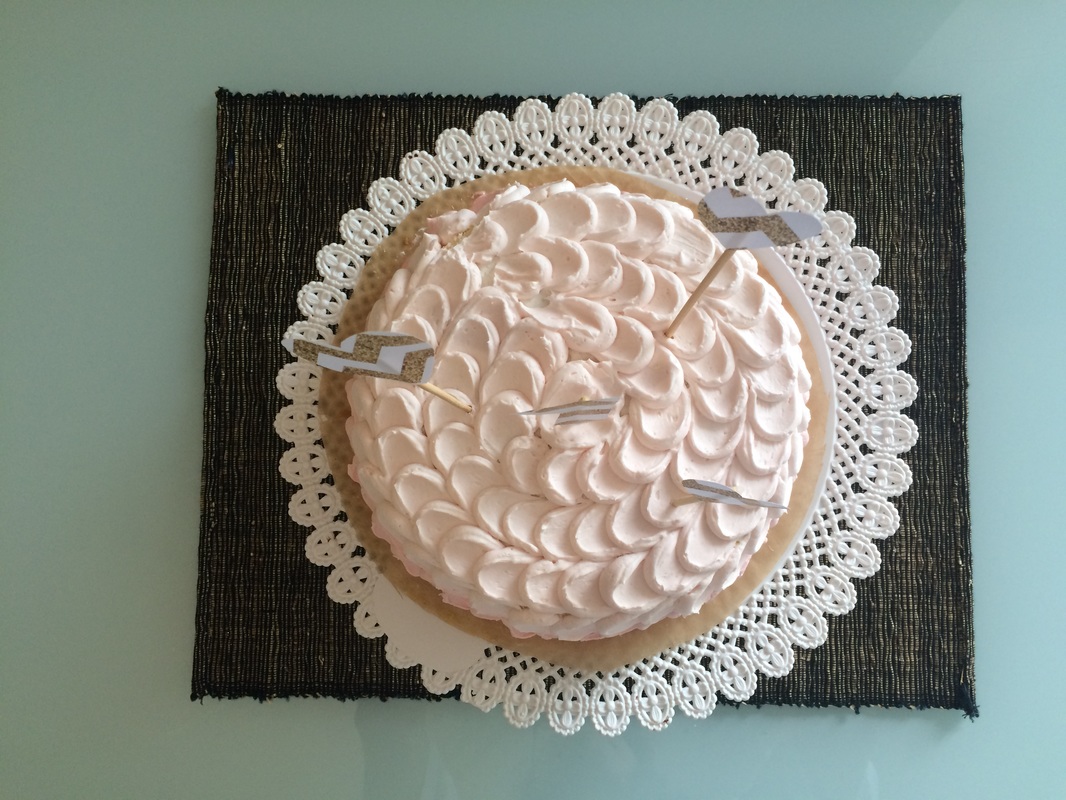 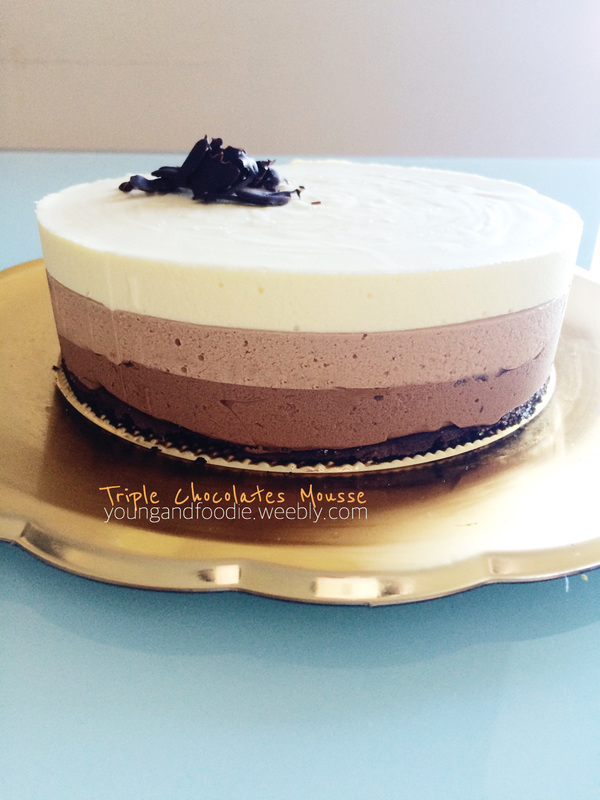 Hi guys! Time for a brand new cake which is from the one and only ERNST KNAM, one of my favorite baker and maitre chocolatier. This is his recipe and it is simply stunning! Unfortunately, I’ve never had the chance to try this cake at his bakery in Milan, but I’m sure it’s superb. Prepare for it… You will not need to worry about how to refrigerate or store it because it will be gone in a minute :) TIME: about 2 hours Ingredients for the cocoa Marquise 52 gr of egg yolks 52 gr of powdered sugar 112 gr of egg whites 105 gr of powdered sugar 45 gr of cocoa powder 15 gr of potato starch Ingredients for the dark chocolate mousse 125 gr of dark chocolate 125 gr of heavy cream 25 gr of egg yolks 1,5 gr of leaf gelatin Ingredients for the milk chocolate mousse 125 gr of milk chocolate 125 gr of heavy cream 25 gr of egg yolks 2,5 gr of leaf gelatin Ingredients for the white chocolate mousse 125 gr of white chocolate 125 gr of heavy cream 25 gr of egg yolks 2,5 gr of leaf gelatin Directions First of all, start with the cocoa Marquise. You can find all the directions for the cocoa Marquise here. And if you haven’t tried the Torta Africana yet… Well, I suggest you to do it :) Soak the leaf gelatine for about 10 minutes in cold water. When the Marquise is ready and not hot anymore, cut a circle of about 18 cm diameter (6 inches) and put it over your a parchment paper and then over your serving plate. Now upholster your circle steel cutter and put it on your serving plate. Put some water in a small pot and when it reaches 90°C soak in a mug where you’ve put the chopped chocolate in. Let it melt until it reaches 45-55°C and then put the mug out of the pot. Meanwhile take the heavy cream and start to whip it but be careful not to whip it completely because you don’t want it too solid and firm. Now squeeze the gelatine and microwave it for 3-4 seconds. Take your semi whipped heavy cream and add to it the egg yolks, the melted chocolate and the gelatine and keep whisking until its all well combined. Pour the mousse into your mold and put it in the freezer for about 30 minutes. Once it’s solid, you can take it out of the freezer and add your next layer of mousse! Repeat all the procedures until you’re done! About the storage, you can keep the cake in the fridge for a maximum of 2 days but i guarantee you that you won’t need that part ;) Please leave me comments if you liked the recipe and please give me advices on my English if there’s something wrong :) 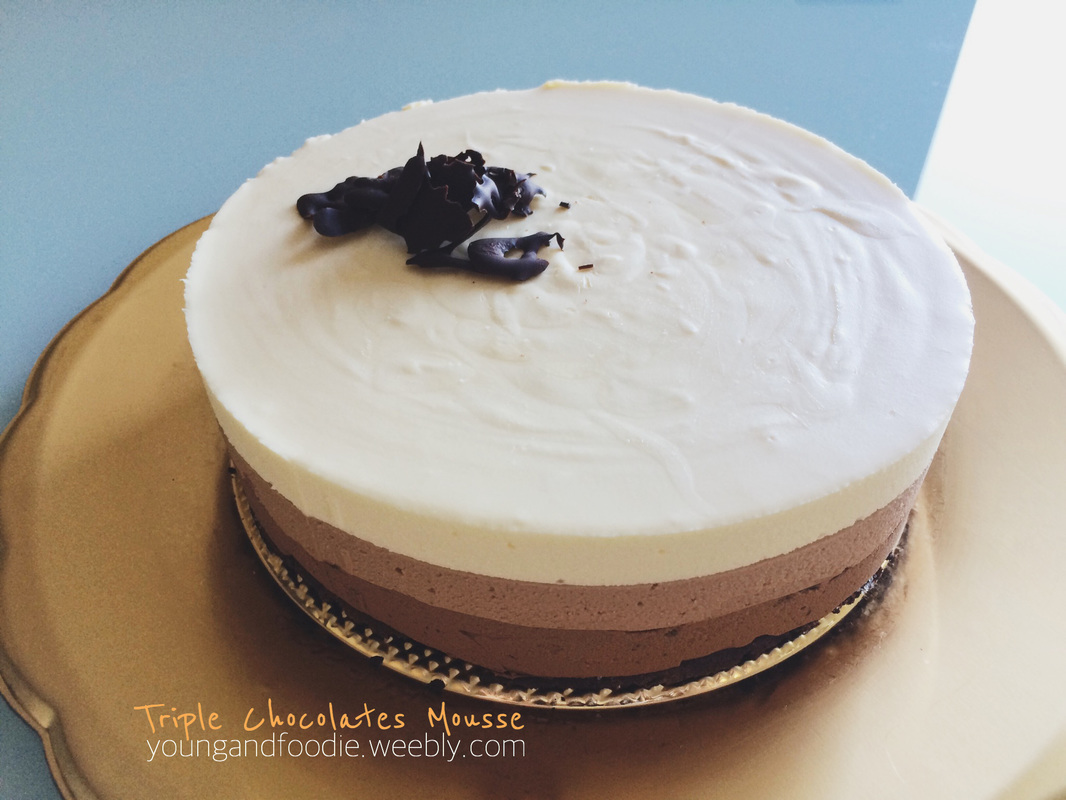 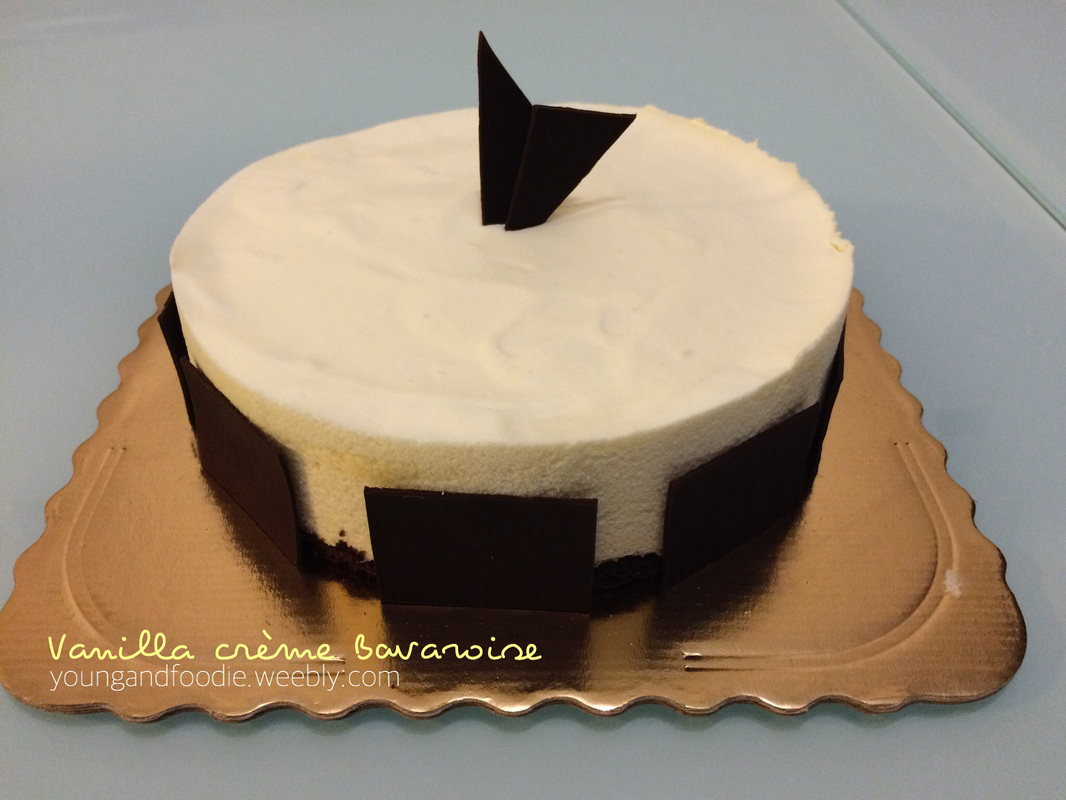 OMG it’s been ages since I’ve uploaded my blog! I’m so bad at keeping up :( Today I want to share with you one of my latest creations. I mean, I didn’t invent anything new… It’s just my personal mix of three yummy desserts. This cake it’s made of: cocoa marquise, vanilla crème Bavaroise, French meringue and melted chocolate. Yep, that’s it! So, I’m going to write down all the steps and then, at the end, I’ll describe how to assemble it! With these amount of ingredients, you’ll get a 20 cm cake (8 inches). Have fun and… Leave a nice comment if you liked it! :) TIME: 30 minutes + 4 hours Ingredients for the cocoa Marquise 52 gr of egg yolks 52 gr of powdered sugar 112 gr of egg whites 105 gr of powdered sugar 45 gr of cocoa powder 15 gr of potato starch Ingredients for the French meringue 70 gr of egg whites (2 eggs needed) 70 gr of powdered sugar 70 gr of granulated sugar Please note that you can use as many eggs as you want. For this recipe 2 eggs will be enough. With the remaining meringue, you can bake some baby meringues ;) Ingredients for vanilla crème Bavaroise 60 gr of granulated sugar 6 gr of leaf gelatin 44 gr of egg yolks (about 3 eggs needed) 170 ml of heavy cream 145 ml of milk 1 vanilla bean Directions First of all, start with the cocoa Marquise. You can find all the directions for the cocoa Marquise here. And if you haven’t tried the Torta Africana yet… Well, I suggest you to do it :) Once you’ve done with it, you can bake the meringues. For the meringues you’ll have to preheat the oven to 110°C first. Then, whip egg whites until foamy using an electric mixer. I think the best egg yolks are the ones at room temperature: I find easier and quicker to whip them if they’re not too cold. After that, start to add the sugars (combine the powdered and the granulated ones in a bowl) a little at a time while continuing to whip. When the mixture becomes shiny and stiff (the trick is this one: turn upside down the bowl. If the mixture does not move at all, then you’re ready to go!), transfer it to a pastry bag. Then pipe a circle (18 cm diameter, about 6 inches) so that you’ll have a meringue plate. With the remaining mixture, feel free to bake baby meringues! Now put them in the preheated oven and bake for 70 minutes. After that, turn off the oven and keep the meringues inside but make sure to leave the oven half-closed by using a wooden spoon (stuck the spoon between the oven door and the fixed part). Now you’re ready for the Bavaroise. Soak the leaf gelatine for about 10 minutes in cold water. Meanwhile, whisk the egg yolks and the sugar with your electric mixer until they’re creamy. Then, pour the milk into a small pot and add the vanilla. Bring them almost to a boil. At this point, put the egg yolks mixture into the milk. Keep whisking by hand until the mixture reach 80/82°C. Now, turn off the fire and add the squeezed gelatine to the mixture. Let it cool. Now, take the heavy cream and whip it until it’s quite solid but not too much! You need a semi whipped cream. Now combine the semi whipped cream to the mixture using a spatula. Be careful not to deflate the heavy cream. How to assembly Take your cocoa Marquise and cut a circle of about 18 cm diameter (6 inches). The important thing is to cut it smaller than the 20 cm diameter of the finished cake, so that you’ll see a complete smooth cake and you’ll not see the brown cocoa layer at the bottom. Of course i didn’t pay attention to that and so you’ll see it in my cake lol. Once you cut it, put it in your serving plate. Now take your circle steel cutter (20 cm diameter) and put it around the Marquise. Now it’s time to add the vanilla Bavaroise. Add about half of your whole crème. Put it in the freezer for about 10 minutes. Now add your meringue plate in the middle of the crème so that, like we did before, you won’t see the meringue on the sides. At this point, add the other half of the crème and you’re ready to put it in the freezer for at least 4 hours. I suggest you to take it out 20 minutes before you want to serve it and keep it in the fridge meanwhile you wait. You’re done! :) Decorations I melt some dark chocolate, poured it on a parchment paper and made a strip. Then I put the melt chocolate in the fridge for 5-10 minutes so that it was hard enough to be cut. I choose to cut it in some small rectangles but you can choose any shape! Once you take the cake out of the freezer, you have to remove the steel cutter and the you’re ready to stick the chocolate to the sides of the cake. 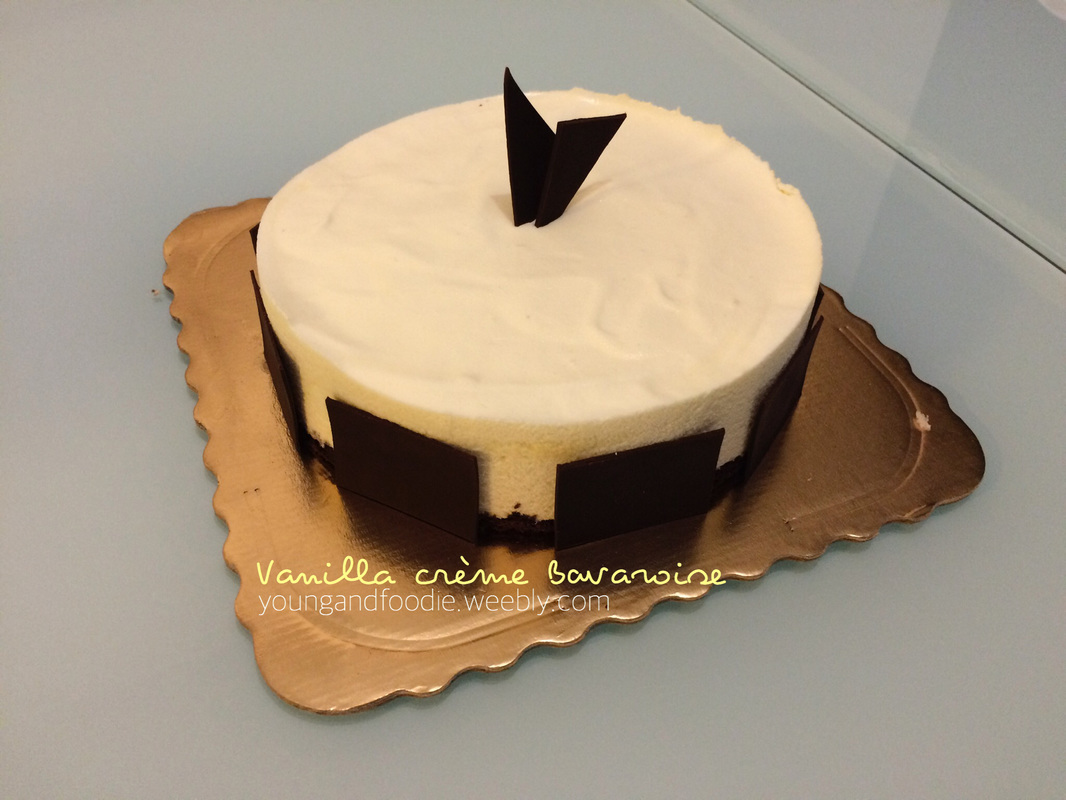 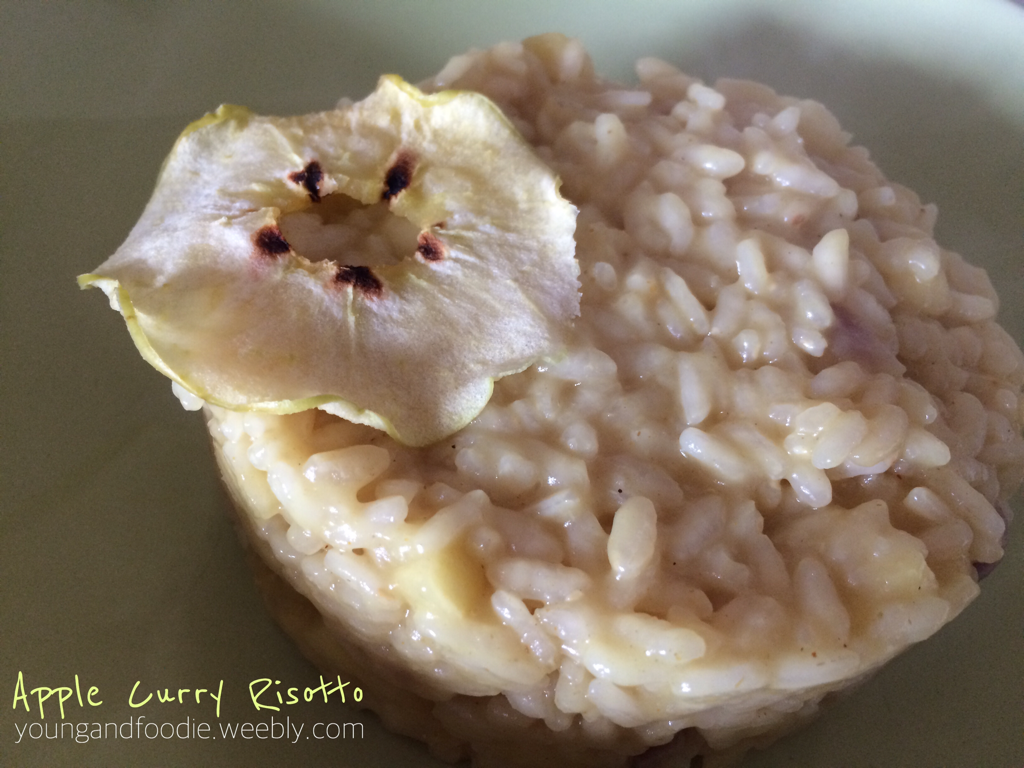 How do you say? An apple a day keeps the doctor away? :) Good, then why don't we try to put it in a delicious risotto? Yes, you've just read risotto! I personally love this combination of spice and fruit and I'm pretty sure my family enjoyed it too because it was literally devoured! So, if you want to surprise your tablemates with something tasteful yet simple... this is your meal. Enjoy! INGREDIENTS (2 people) 180 gr Carnaroli rice 1 apple (Golden Delicious) 2 teaspoons of curry powder 1/2 Tropea onion 1/2 glass of Pinot Grigio 1 liter of hot broth butter DIRECTIONS Firsy of all, heat a large pot over medium heat and then add the butter and the Tropea red onion. Stir frequently for about 5 minutes. Add the Carnaroli rice and let it toast a little bit. When it's golden, add the Pinot Grigio and once it's faded, add the chopped apple to the pot. Now gradually add the broth (you may not need a whole liter, you'll just know when it's enough) to the rice and cook for about 15 minutes. When the quartes's passed, add the curry powder and cook for another 3 minutes. You can now serve and enjoy your excellent risotto! If you want to decorate your risotto, you can add an apple slice to it. I made some apple chips for a snack and I used a couple of them to decorate this meal :) Let me know if you try thi recipe and if you're in love with it as much as I am! 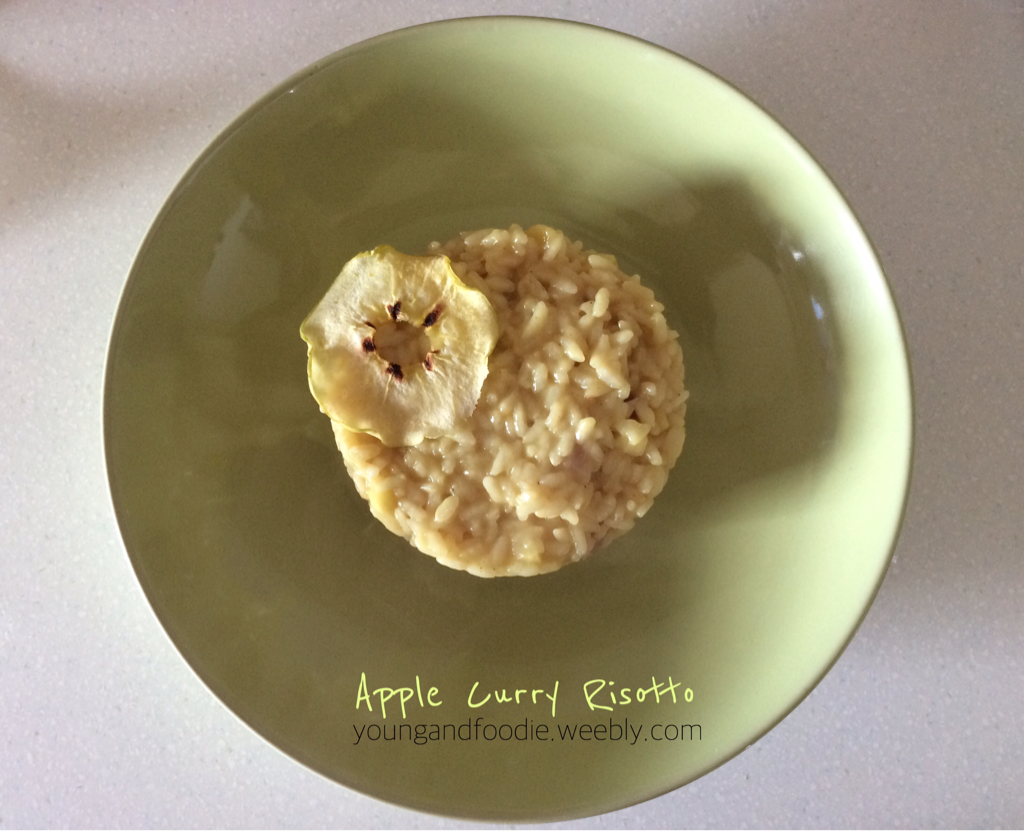 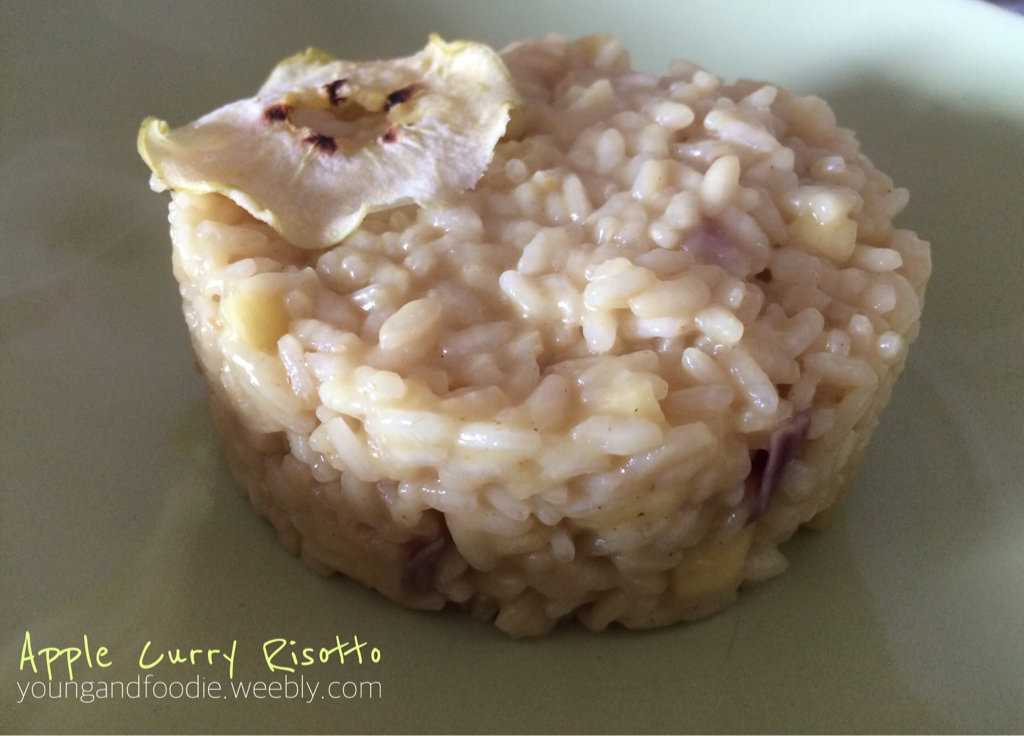 These are the BEST vegan cookies I’ve ever had. I think you should give them a try… just in case ;) And, as you probably figured out, I’m a dessert-ish girl. Yup. Whenever I can, I always want to bake something new and, possibly, something low fat. This recipe has NO EGGS and NO BUTTER! Plus, you can definitely make it gluten free by using an appropriate flour. If you are still not sure about these super yummy cookies, I may add that they’re super quick to do! I say no more… Go grab your wooden spoon and let’s get started! INGREDIENTS (makes about 20 cookies) 250 gr flour 60 gr granulated sugar (*) 60 gr brown sugar (*) 75 ml warm water 6 gr baking powder 3 spoons of chocolate chips DIRECTIONS Put all the sugar, the baking powder and the water in a bowl and stir them gently until they are all well combined. Add the flour slowly while mixing with your wooden spoon. Now add the oil and keep mixing. When everything is well combined, add the chocolate chips. Take the dough, wrap it in cling film and chill in the fridge for 1 hour (or more if you can). Now take it out from the fridge and to roll, lightly flour dough and counter. Roll out gradually, periodically letting dough rest for a moment before continuing. Make sure your dough is 3-4 mm thick and then cut your cookies. Bake at 180° until cookies are golden around the edges, but soft in the center (I baked them for 11 minutes). Remove from oven and let cool on baking sheet then transfer them to a wire rack and let cool completely. Now, it’s time to eat! (*) You can use 120 gr of white sugar or 120 gr of brown sugar as well. 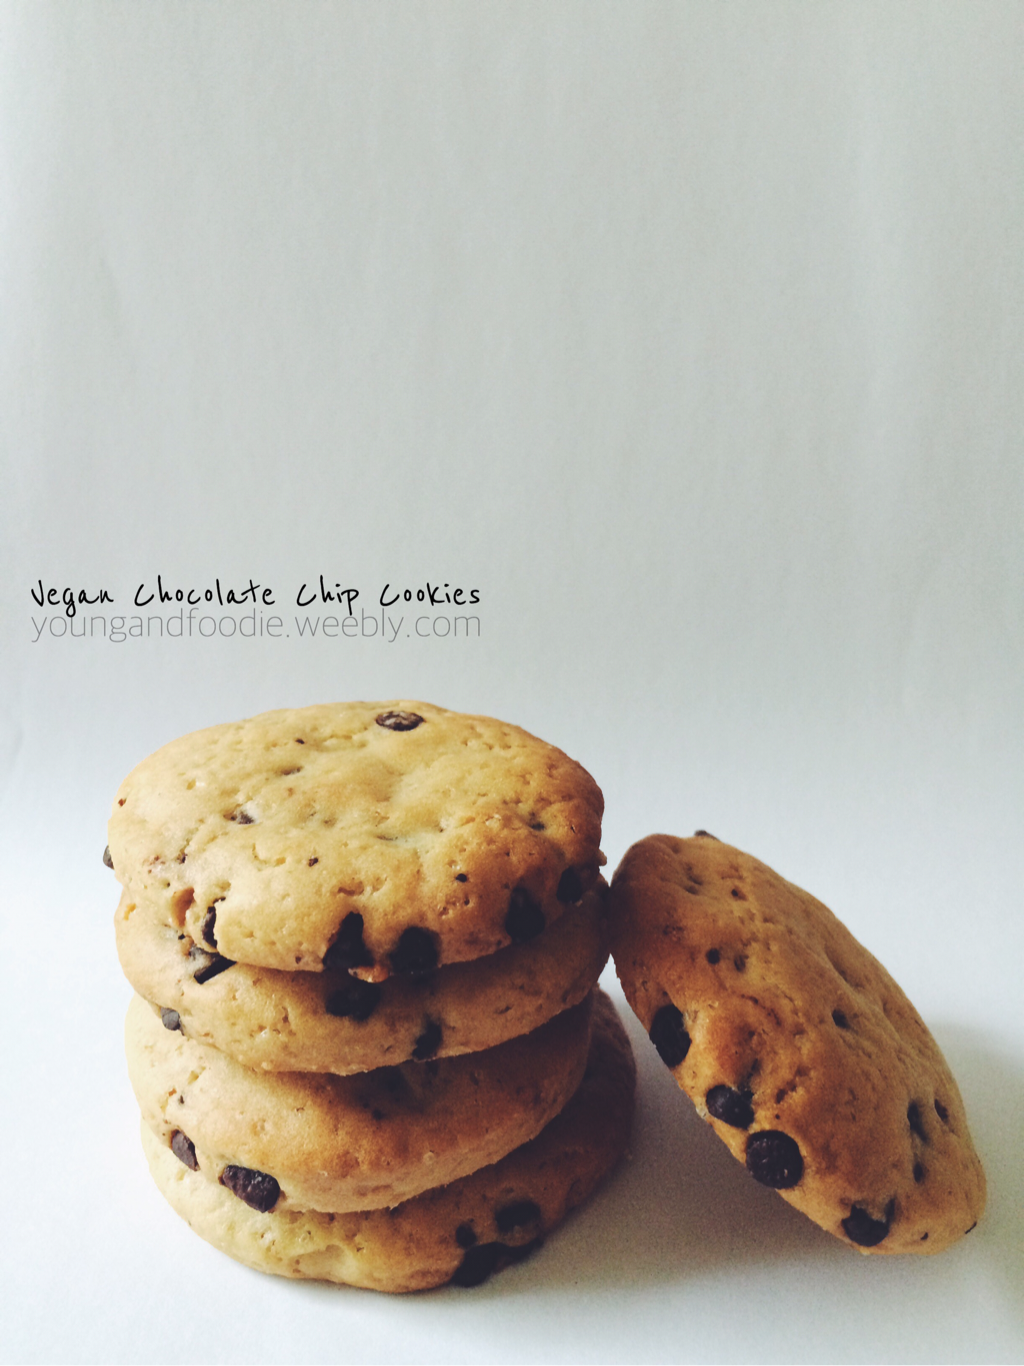 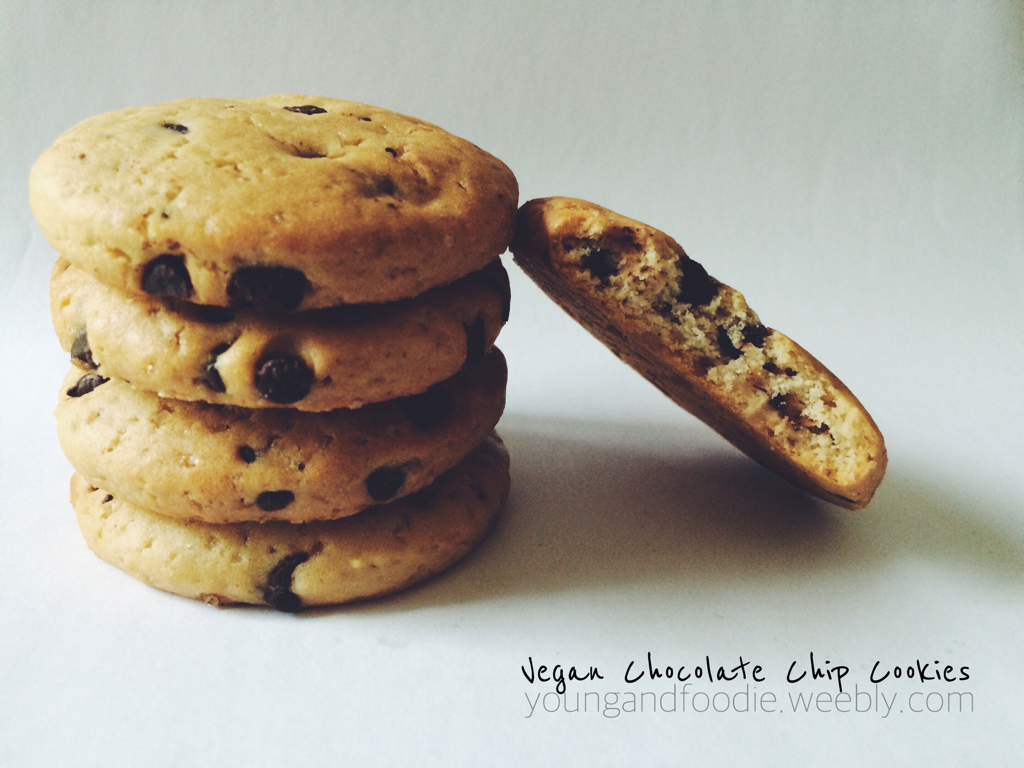 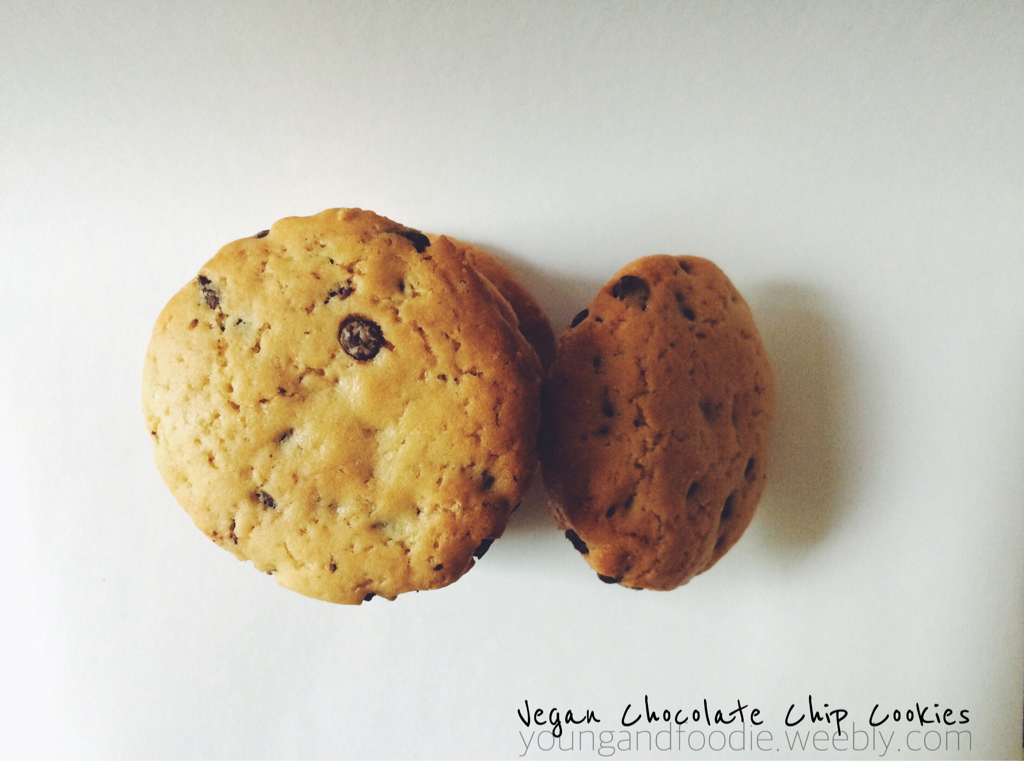 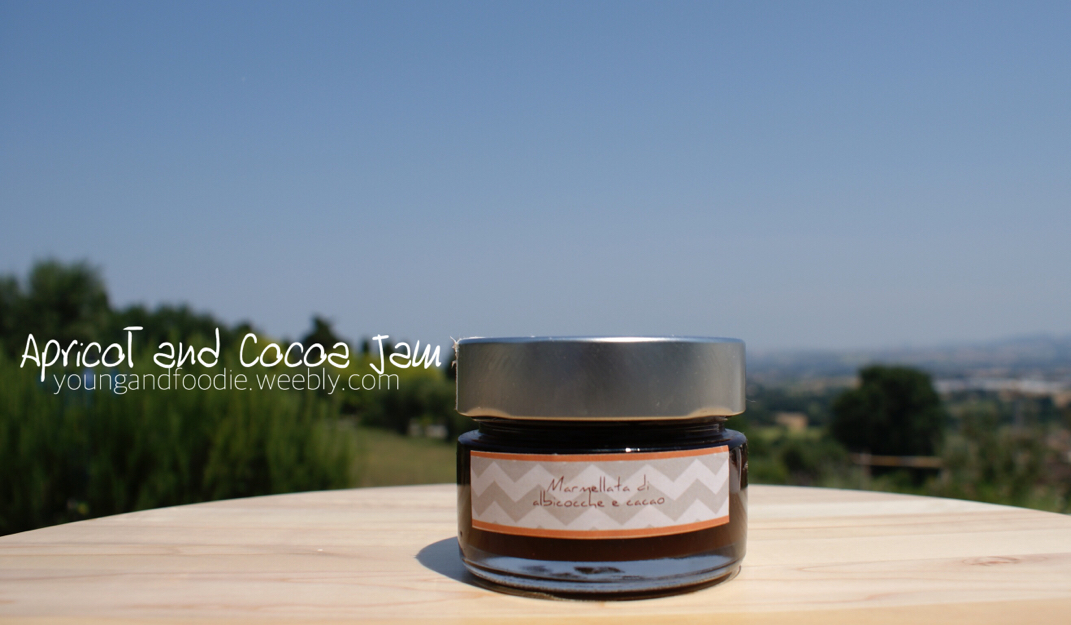 It's summertime here where I live and I'm blessed enough to live in a wonderful place, just outside the city, with a garden and with some fruit trees. P.S. With 620 get of apricots, I made 3 little jars (the ones in the pictures) 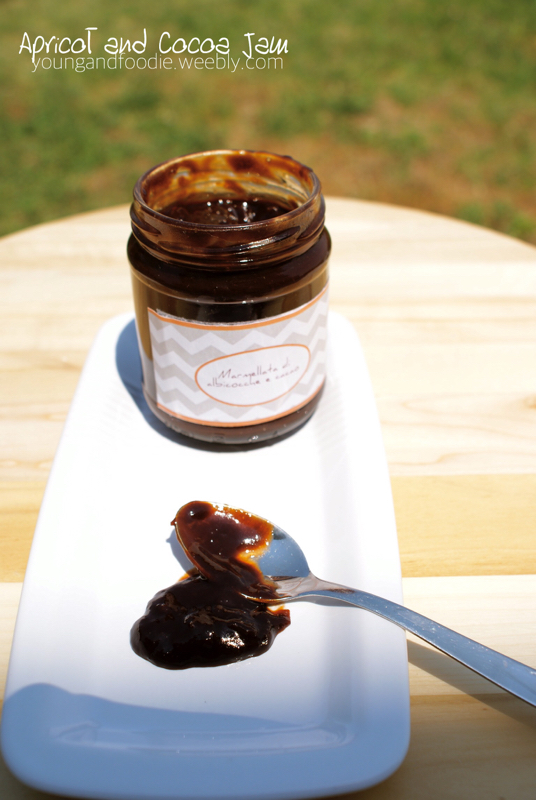 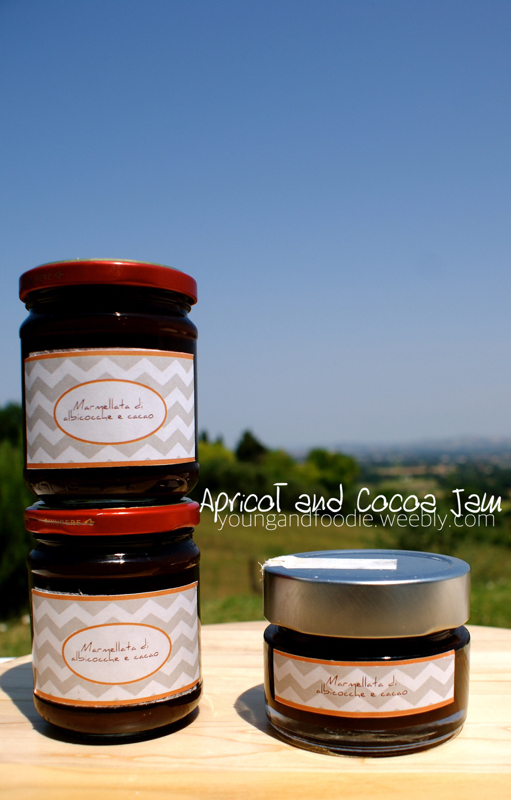 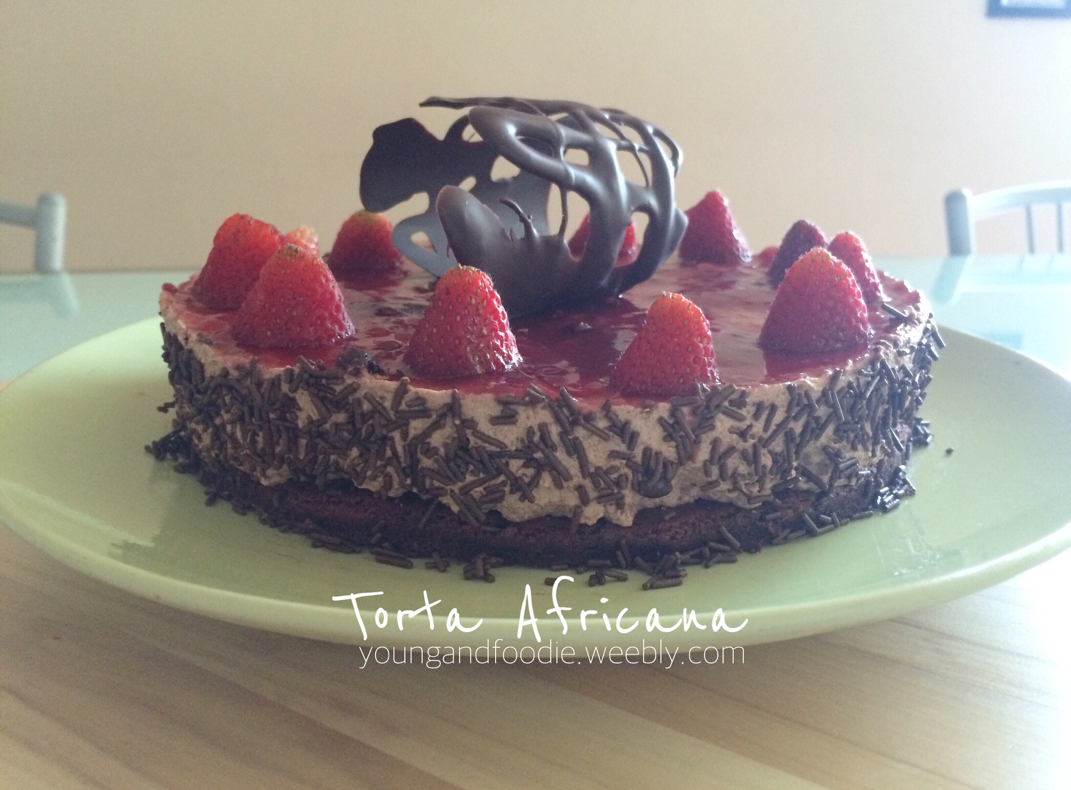 Are you ready to bake a pure joy? Trust me, try this cake once and you'll want to do it again and again ;o) This is, so far, one of the best cakes I've ever done! The first time I made it, it was literally devoured! I had no doubts that the "Torta Africana" (which stands for African Cake) would be a success because it's a recipe from THE master Ernst Knam, the king of chocolate! But seriously, you're going to love it if you like chocolate and berries! So, let's start! Please, note that this recipe it's for a 20 cm cake (8 inches) and should serve 6 people. But trust me, you'll need a bigger one if you have 6 guests ;o) P.S. This is a gluten free cake! Ingredients for the cocoa Marquise 52 gr of egg yolks 52 gr of powdered sugar 112 gr of egg whites 105 gr of powdered sugar 45 gr of cocoa powder 15 gr of potato starch Ingredients for the chocolate mousse 150 gr of dark chocolate 300 gr of cream Ingredients for the decorations 2-3 tablespoon of strawberry jam (or raspberries) 12-16 strawbwerries (or raspberries) Directions Start with the Marquise: use an electric mixer to beat yolks and sugar until it's soft and fluffy. Then, in another bowl, make a meringue with the egg whites and the other 105 gr of powdered sugar. When the meringue is ready, incorporate it gently in the yolks and start combining with a spatula. Add in the sifted cocoa powder and the potato starch and keep stirring gently. It's important to do this slowly so that the air incorporated will keep the mixture soft. Put the mixture on a baking tray, level it up until it's about 2-3 cm high and bake for 8 minutes in a preheated oven at 200° Celsius. Take it out of the oven and immediately sprinkle some caster sugar on it (because caster sugar has a hygroscopic power. This will keep the humidity away from your Marquise). Now, it's time for the chocolate mousse. Put your chopped chocolate into a microwave-safe bowl and put it in the microwave for few seconds. Stir the semi melted chocolate and repeat until it's done (if you don't have a microwave, it'll be totally fine to do this passage in a double boiler). Now, let it cool down a little. Meanwhile, take the cream and start to whip it. Please note that you only need a semi-whipped cream! Now that the mousse' ingredients are ready, put 1/3 of the semi whipped cream into the melted chocolate and start whisking. When everything is well incorporated, put the chocolate mixture into the 2/3 of the semi whipped cream. Whisk again until it's all incorporated. Now, take your serving platter, put a cake ring (I used a 20 cm aluminium one) on it, put your cocoa Marquise in it and press gentle. Now add the chocolate mousse and try to even it out so that you'll have a flat surface. Now put it in the fridge for 3 hours or in the freezer for 40 minutes. When you're ready to take the cake out of the fridge/freezer, you can start with the decorations. Take a small pot and put the jam in it with a tsp of water (maybe you'll need another one). Be careful: you just have to warm the jam! It doesn't have to boil! At this point, you're ready to pour it on the top of your cold mousse. Level the jam up and add the strawberries/raspberries. I also added some chocolate decorations, but it's up to you :o) Keep the cake in the fridge until you're ready to serve and eat it. Enjoy this pure pleasure! This is the link of the original recipe http://www.realtimetv.it/web/molto-bene/ricette/ricette-molto-originali/africana-con-gelatina-ai-lamponi/ 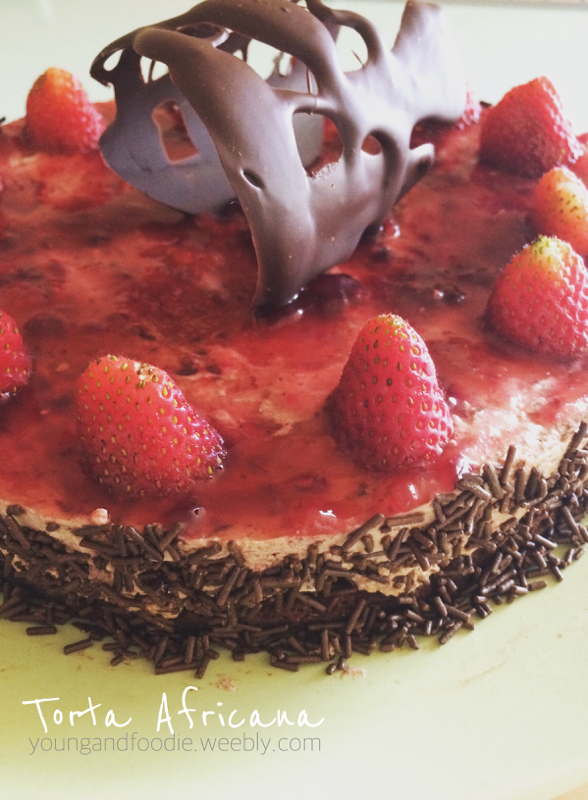 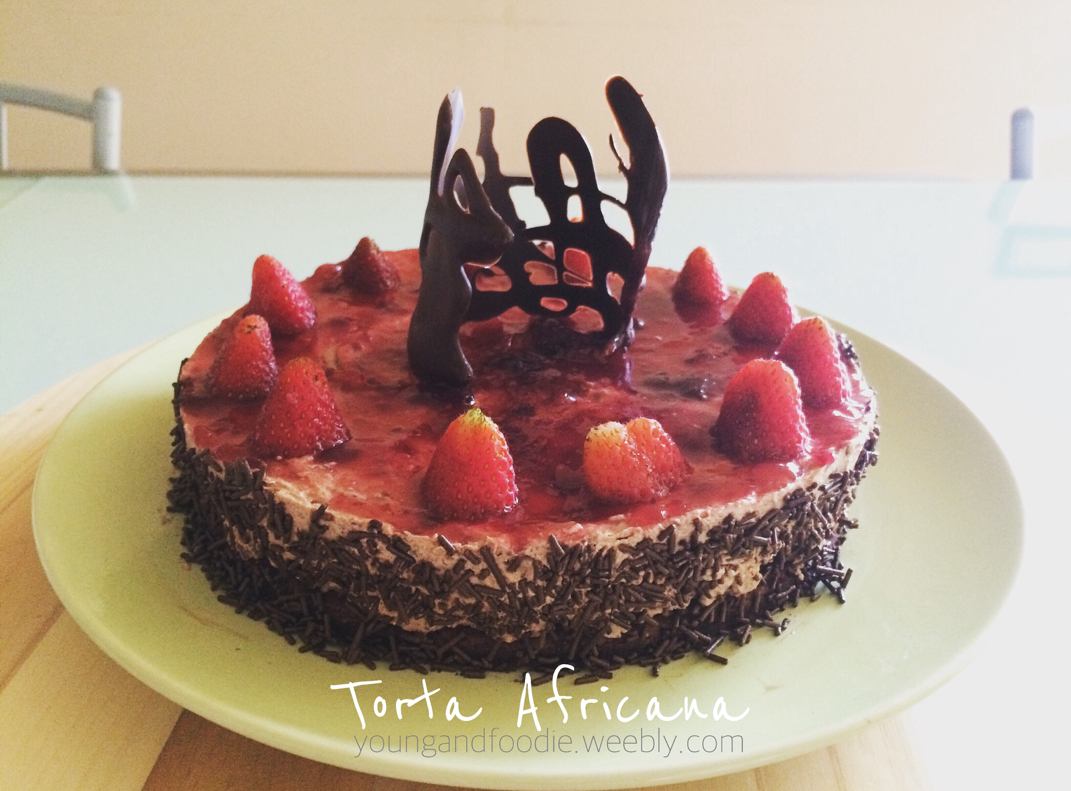 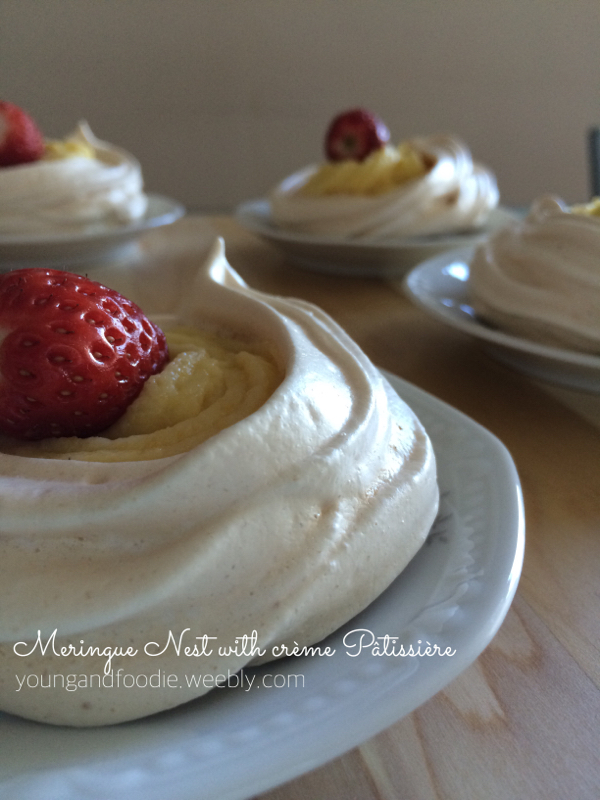 Hi friends! It's been a while since I updated my blog so I want to share with you some really nice recipe. I live in Europe and in May spring totally hits us and... What's better than some spring inspired treat? My friends and family know that I do have a crush on Meringues (really, I think I may have a problem, lol) so I bake them quite a lot when I have the chance. But cooking or baking the same thing over and over can be boring sometimes, so I decided to do something different this time. It is basically a French Meringue with crème pâtissière and some fresh berries, I put some strawberries but you can totally use raspberries, blueberries or even some kiwi fruits. No more talking... let's go to the recipe! Ingredients for the French Meringue: (it makes about 25 meringues + 4 nests) 95 gr of egg whites (*) 95 gr of caster sugar 95 gr of icing sugar vanilla extract (optional) Ingredients for the Crème Pâtissière: (you will not need the whole quantity of Crème to fill the nests) 500 ml of milk 135 gr of yolks (*) 150 gr of caster sugar 50 gr of flour (*) I used 4 small eggs: all the yolks for the Crème Pâtissière and all the egg whites for the meringues. Directions First of all, let's start with the French meringue. Place the egg whites in bowl of mixer with the whisk attachment or use an hand mixer (that's what I always do because I don't have a Kitchen Aid yet) and beat until soft peaks form. This is the most important thing to do for perfect meringues, so make sure to do it right. At this point you just have to add gradually the mixture of both the sugars (just mix them a bit in a bowl and then add the mixture to the egg whites) and keep whisking until all the sugars are well incorporated. Put some parchment paper in a baking tray first and then you can transfer your meringue into your piping bag and let the magic happen! ;o) For the nests, just pipe a disc by making a spiral and then build the height of your basket at the edge of your spiral. For the other meringues, pipe some mixture and just twirl it. Bake for 75 minutes in the pre heated oven at 110° Celsius and then let the meringues dry in the oven for a little bit more (the whole night if you can. But they will be totally delicious even if you eat them right after). For the Crème Pâtissière, start by bringing the milk plus half of the sugar (so just 75 gr) to boil. If you have it, you can definitely add some vanilla extract. Meanwhile in another bowl, whisk together the egg yolks, the other 75 gr of sugar and then whisk in the sifted flour. Once the milk is boiling, add it slowly to the egg mixture while whisking vigorously. Once all the milk is incorporated, pour everything back into a pan and bring to a gentle boil while stirring with a whisk or with a wooden spoon. Wait for about 30 seconds and then transfer the crème into a bowl (a glass one is better) and cover it with some food plastic wrap (this will prevent the cream from forming a crust). Wait until it cools down a bit and then put it in the fridge. Right before you serve your dessert, pipe some crème pâtissière into your meringue nests and add your fresh berries/strawberries/kiwi fruits. If you want, you can sprinkle some golden/maple syrup or carame/chocolatel sauce on them. Enjoy :o) 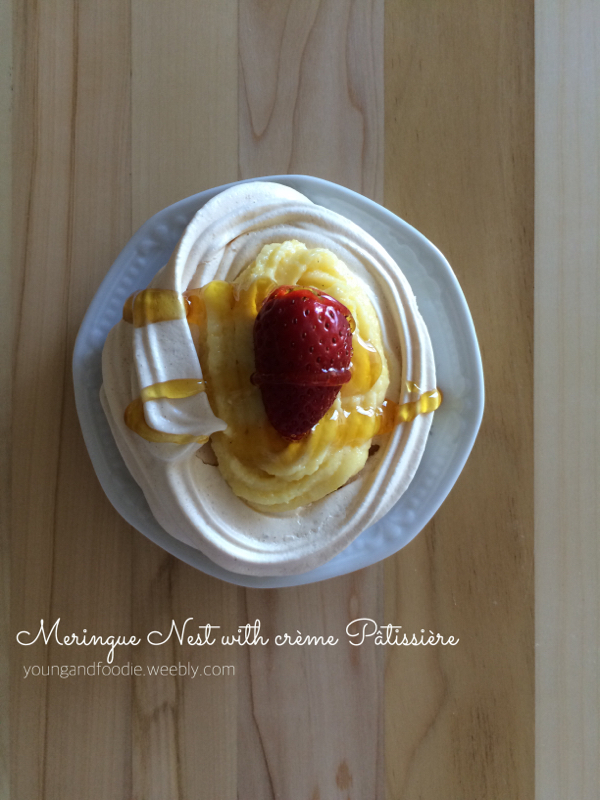  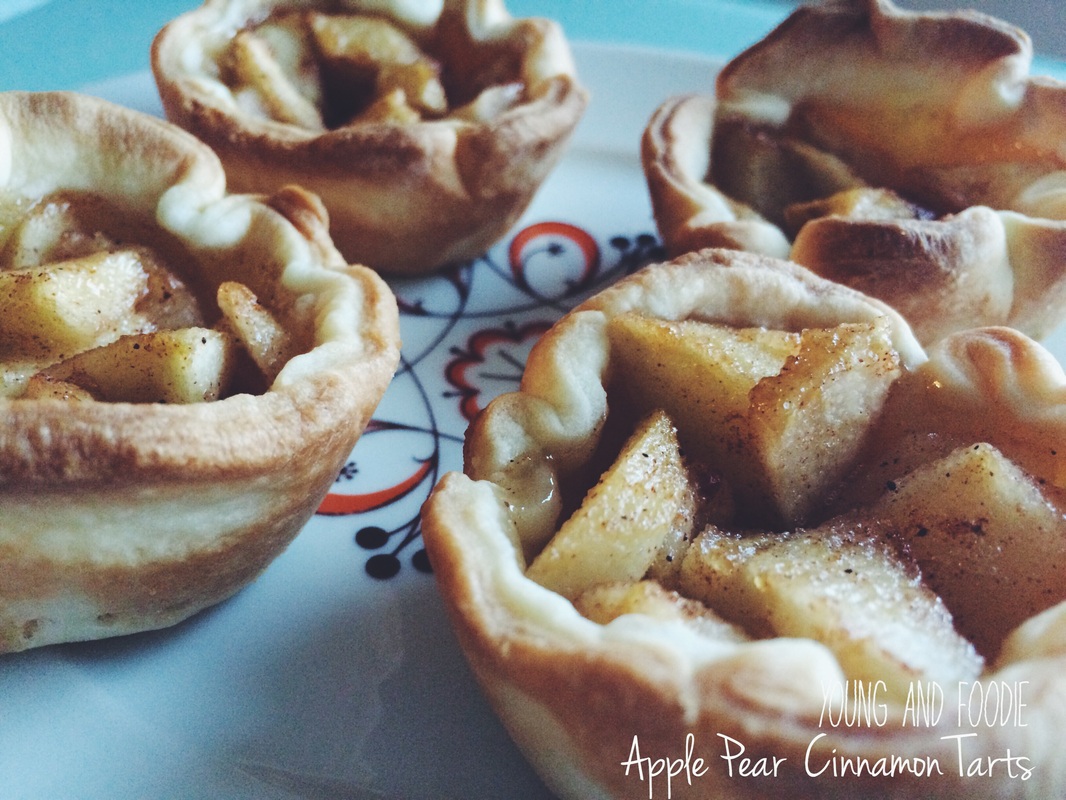
Hi friends! It's been a while since I updated the blog, so let's put it right! :o) This is a perfect recipe for a tea break or for your breakfast. I know that breakfast around the world is so different but this little treat, with a cup of coffee or tea or milk, could be a great one. But yes, you will probably have 3 or 4 of them if you are used to a very considerable meal. :o) Here's a very nice video about breakfast in the world... take a look! But let's see what we need for these mini tarts! APPLE PEAR CINNAMON TARTS Ingredients (for about 10 tarts) Shortcrust pastry (about 200gr) Apples Pears Lemon juice Cinnamon Brown sugar Directions First thing you need is the shortcrust pastry. Here is the recipe of the one I used for the Mocaccino Cake, but you can use it for any tart! Once you have it ready, cut it into 10-11 circles. You can use a cup or a glass or a cookie cutter... whatever you have! ;o) Once you have all the circles ready, grease the inside of the cupcakes pan, put some flour on each cavity and then lay down the shortcrust pastry. Now you're ready to fill the mini tarts! As you noticed, I didn't specified how many apples or pears you will need. I think I used about 1 apple and half of a pears, but of course it depends on how big your fruit is. So, chop some apples and pears and put the little pieces in a bowl. Add some lemon juice and make sure it covers at least half of your fruit. Stir a bit and then fill your mini tarts. When you've done, add some cinnamon and some brown sugar on top and then put the pan in the oven at 180°C for about 10-15 minutes. 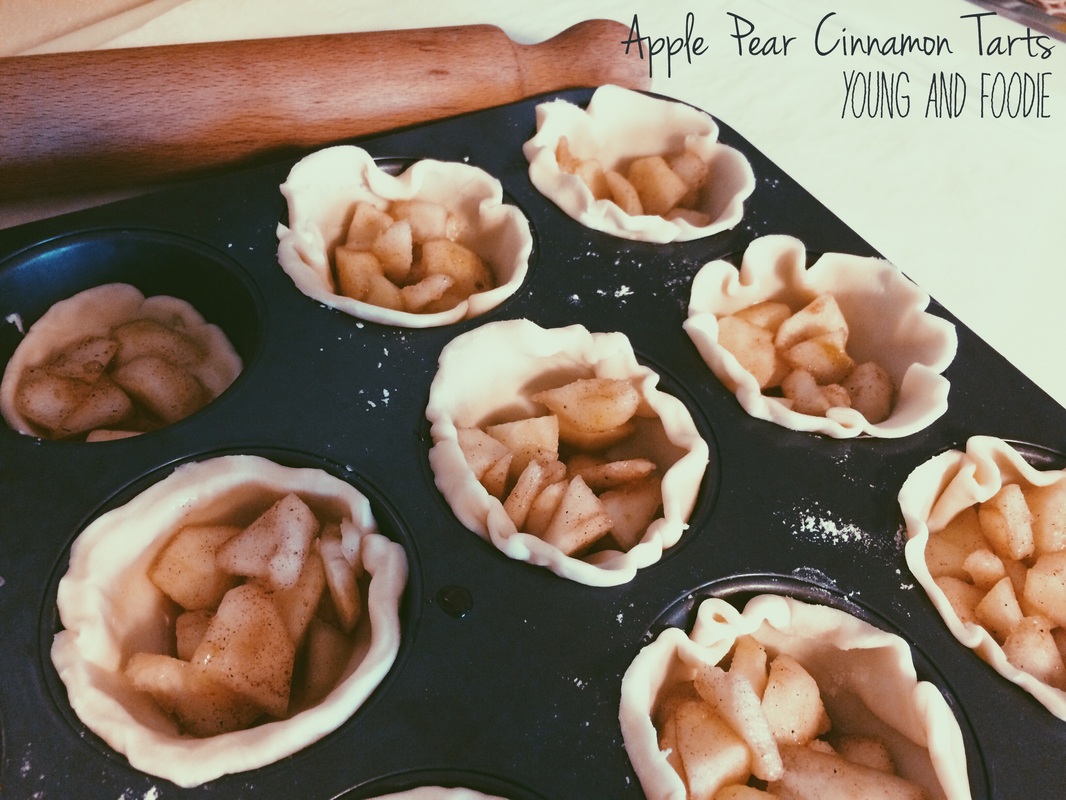
|
About meWelcome to my foodie blog! I'm Silvia, a 20 something Italian girl. I'm an architecture student who likes to bake and cook. Archives
April 2017
Categories
All
|
 RSS Feed
